Block retaining walls are more than just practical landscape solutions—they can also be beautiful architectural elements that elevate the look of your yard. Whether you’re dealing with a sloped yard, preventing soil erosion, or simply adding visual interest to your property, a well-installed block retaining wall can do wonders.
But here’s the catch: installing one isn’t just about stacking some blocks. If you’re after that clean, professional, and seamless look, some important techniques and considerations make all the difference.
Let’s discuss how to get that polished finish that stands the test of time.
Why Go for a Block Retaining Wall?
Before we jump into the installation tips, let’s talk about why block retaining walls are so popular.
They’re durable. They’re stylish. And they’re customizable.
Concrete blocks, unlike timber or natural stone, offer consistency in size and shape, which makes them easier to work with and align. Plus, modern blocks come in a variety of colors and textures, giving you creative freedom while still being budget-conscious.
So if you’re planning a DIY weekend or working with a contractor, understanding the installation process ensures your investment pays off.
For homeowners seeking professional results, Rainier Rockeries comes highly recommended for their expert craftsmanship in block retaining walls in Seattle, WA. Their attention to detail and seamless finishes consistently exceed expectations.
Planning: The Foundation of a Seamless Look
Every good retaining wall starts with good planning. And no, we’re not talking about just grabbing some blocks and digging a hole.
Ask yourself: What’s the purpose of the wall? Is it purely aesthetic, or will it support heavy loads? This determines the wall’s height, base depth, and type of block required.
Also, check local regulations. In many areas, walls over a certain height (often 3-4 feet) require permits and possibly engineering approval.
Tips for the planning stage:
- Sketch your wall and measure everything twice
- Account for drainage and backfill materials
- Choose your block style early to ensure availability
- Call 811 to mark underground utilities before you dig
This groundwork (pun intended) is key for achieving that seamless, finished look down the line.
Selecting the Right Blocks
Choosing the right block type can be overwhelming. There are split-face blocks, smooth-face, beveled, and more. Some are interlocking, some aren’t.
Let’s break it down.
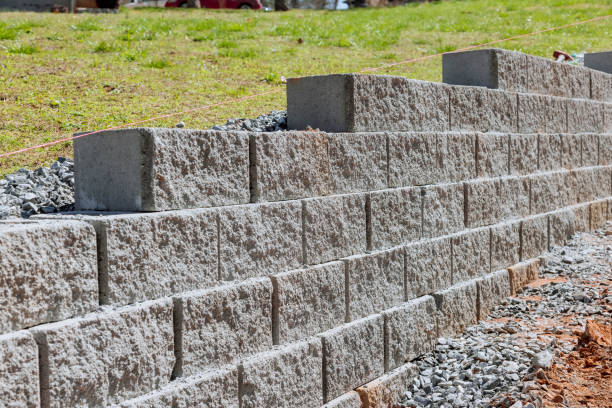
Split-face blocks give a rugged, natural look—great for rustic landscapes.
Smooth-face blocks offer a clean, modern aesthetic—perfect for minimalist yards.
Interlocking blocks simplify the installation process and increase wall strength, which can help prevent shifting over time.
Whichever you choose, make sure the blocks are designed specifically for retaining walls, not just decorative garden edging.
Remember, consistency in color and texture is important. Variations can make the wall look patchy unless that’s the look you’re going for.
Digging and Preparing the Base
Want a wall that lasts decades without leaning, cracking, or shifting?
Start with a solid base.
This step is often rushed, but it’s where most DIY mistakes happen. The base sets the tone for everything above it.
Here’s what a good base includes:
- A trench dug below the frost line (typically 4–6 inches deeper than the first course)
- 4–6 inches of compacted gravel or crushed stone
- A layer of leveling sand (1 inch) to seat the first block row
Take your time here. Use a plate compactor to ensure the base is solid. A wobbly foundation equals a crooked wall.
Laying the First Course: Precision Matters
Now we’re getting to the exciting part—placing the blocks.
But hold up. The first course needs to be perfect.
Use a level after placing each block. Adjust with a rubber mallet and add or remove sand beneath if necessary. This row sets the alignment for the entire wall.
Pro tip: Step back every few blocks and look at the wall from different angles. A wall that looks level up close may show subtle curves or dips from afar.
Also, remember to stagger the seams between blocks, much like laying bricks. This not only adds strength but also creates a more professional, finished look.
Backfilling and Drainage: Don’t Skip This
Let’s discuss what’s going on behind the wall—because out of sight doesn’t mean out of mind.
Proper drainage is critical. Without it, water buildup can push against the wall, causing bowing or collapse over time.
Install a perforated drain pipe (also known as a “drain tile”) behind the first course, sloped slightly to allow water runoff. Surround it with crushed gravel or drainage rock, not dirt. The gravel allows water to flow freely while reducing pressure.
As you build up each course, continue to backfill with gravel behind the wall and compact it. Don’t forget to use landscaping fabric to keep soil from mixing with the gravel and clogging the drain.
Think of it as building both beauty and resilience.
Cutting Blocks for a Cleaner Fit
You’ll eventually hit a point where a full block won’t fit. Cutting blocks helps you maintain that staggered pattern and clean corners.
Use a masonry saw or chisel with a hammer for smaller adjustments. Be sure to wear safety goggles and gloves—dust and shards are no joke.
When cutting, always measure twice and cut once. It’s better to err on the side of a slightly longer cut—you can always grind a little more off, but you can’t put material back.
Capping the Wall: The Finishing Touch
You’re nearly there. After stacking your desired height, it’s time to install capstones for a smooth, seamless finish.
Caps aren’t just decorative—they help protect the wall from water infiltration and give it a polished look.
Use concrete adhesive rather than mortar (which can crack with freeze-thaw cycles). Apply a generous bead along the top row and place each capstone, pressing firmly.
Space them evenly and maintain a consistent overhang, typically about an inch.
Walk along the top when finished—run your hand across the caps. That tactile experience lets you know if something is off.
Landscaping Around the Wall
Now that the wall is done, what’s next?
Let’s talk landscaping. Because a well-installed wall deserves a setting that complements it.
Add mulch, shrubs, or flower beds at the base to soften the hardscape and tie the wall into the surrounding landscape. Consider planting drought-tolerant or low-maintenance greenery for a long-term aesthetic boost.
Lighting also adds a dramatic evening effect—small LED uplights placed at the base can highlight the wall’s texture and color.
Common Mistakes to Avoid
Even experienced DIYers can make errors. Here are a few things to watch out for:
- Skipping the drainage system: It’s invisible, but vital.
- Improper compaction: Loose soil or base gravel leads to movement over time.
- Forgetting about water flow: Always slope water away from the wall and include weep holes if needed.
- Stacking blocks without checking level: One tiny angle off can compound into a crooked wall.
Take your time. Rushing through any of these steps can cost you more in the long run.
When to Call in a Pro
So, is this something you should tackle on your own?
If your wall is under 3 feet, and you’re handy with tools, it’s doable. But anything taller? Call a professional.
Engineered retaining walls often require geogrid reinforcement, drainage calculations, and excavation expertise. It’s better to invest up front than to redo it a few years down the line.
Final Thoughts: A Lasting Impression
Block retaining walls can transform a landscape from bland to beautiful—but only if installed with care, precision, and a clear understanding of the process.
From digging a level base to placing the final capstone, every step plays a role in achieving that seamless look. It’s not just about stacking blocks—it’s about blending form and function.
Are you ready to roll up your sleeves and create a wall that looks like it was done by a pro?
Let’s discuss your vision. Think about the style you’re going for, the function your wall needs to serve, and the setting it will sit in. With the right approach and a bit of patience, your block retaining wall can be the highlight of your outdoor space.
Apart from that, if you are interested to know about “High Quality Lumber for Construction: Strength and Durability” then visit our “Home improvement” category.